Tutorial
Click on thumbnailed images to enlarge
Today's lesson is on how to change the color of an eye. You can of course use this base to change the color of anything else. This tut was written using Gimp 2.4. So of course if you're new to Gimp it may be different because Gimp 2.6 is now out.
First, Find an image of an eye.
Google "Eye"
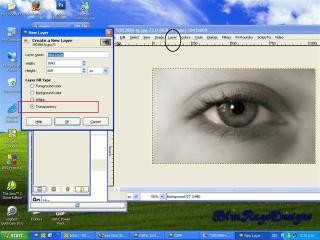
Open gimp > open image.
Next on the image of the eye, go "layer > New Layer" (In black circle)
The next dialog box should come up.
Make sure transparency is selected, don't change width or length.
Click "OK"
[link=http://i253.photobucket.com/albums/hh43/Jana_f_Hayes/steponeSmall.jpg]larger [/link]
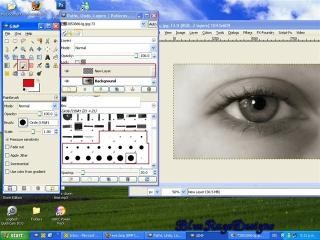
Select the paint brush tool (Small red square)
And make sure any one of these shown brushes are selected.
You can change size of the brush with "scale" on the paint brush option dialog box.
Make sure the layer "New Layer" is selected as shown
[link=http://i253.photobucket.com/albums/hh43/Jana_f_Hayes/steptwoSmall.jpg]Larger[/link]
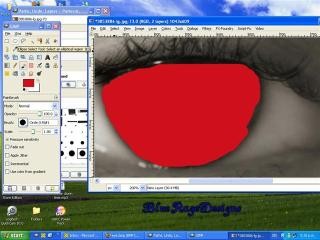
Assuming you know how to select a color, select the one you think would look good.
Paint the eye, you can change the size of the brush to fit in small spaces etc

[link=http://i253.photobucket.com/albums/hh43/Jana_f_Hayes/stepthreeSmall.jpg]Larger[/link]
Zoom in the image (As shown here, mines 200%)
To get in the small gaps you may have missed while zoomed out.
(This is rushed, so it does look crappy)
It doesn't matter if you paint over the middle of the eye. gives it more effect.
[link=http://i253.photobucket.com/albums/hh43/Jana_f_Hayes/stepfourSmall.jpg]Larger[/link]
After you have colored in the eye, (OR actually you could use this tut with anything)
select "Mode" from the dialog box "Layers paths channles etc". You can select anyone i've shown here to make it look semi natural.
You can also select any mode at all if you want to "Experiment"

[link=http://i253.photobucket.com/albums/hh43/Jana_f_Hayes/StepfiveSmall.jpg]Larger[/link]
There are two things you can do here.
a) leave the color as is. If that's the case, right click on the anyone of the layers and select "flatten image"
B) you can make the eye darker. In this case, you right click the layer "New Layer" and select duplicate. Do this however many times you need until the you have the right color.
THEN flatten the image as said above

[link=http://i253.photobucket.com/albums/hh43/Jana_f_Hayes/stepsixSmall.jpg]Larger[/link]
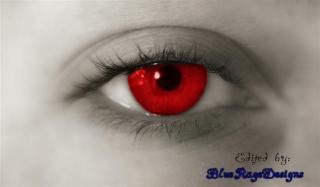
This is what I've got.
Not exactly perfect, but as long as no one zooms in, it's not that noticeable.
[link=http://i253.photobucket.com/albums/hh43/Jana_f_Hayes/FinishedSmall.jpg]Larger[/link]
Hope this helped.
Any probs?
Comment. :D
.jpg)
First, Find an image of an eye.
Google "Eye"
Open gimp > open image.
Next on the image of the eye, go "layer > New Layer" (In black circle)
The next dialog box should come up.
Make sure transparency is selected, don't change width or length.
Click "OK"
[link=http://i253.photobucket.com/albums/hh43/Jana_f_Hayes/steponeSmall.jpg]larger [/link]
Select the paint brush tool (Small red square)
And make sure any one of these shown brushes are selected.
You can change size of the brush with "scale" on the paint brush option dialog box.
Make sure the layer "New Layer" is selected as shown
[link=http://i253.photobucket.com/albums/hh43/Jana_f_Hayes/steptwoSmall.jpg]Larger[/link]
Assuming you know how to select a color, select the one you think would look good.
Paint the eye, you can change the size of the brush to fit in small spaces etc
[link=http://i253.photobucket.com/albums/hh43/Jana_f_Hayes/stepthreeSmall.jpg]Larger[/link]
Zoom in the image (As shown here, mines 200%)
To get in the small gaps you may have missed while zoomed out.
(This is rushed, so it does look crappy)
It doesn't matter if you paint over the middle of the eye. gives it more effect.
[link=http://i253.photobucket.com/albums/hh43/Jana_f_Hayes/stepfourSmall.jpg]Larger[/link]
After you have colored in the eye, (OR actually you could use this tut with anything)
select "Mode" from the dialog box "Layers paths channles etc". You can select anyone i've shown here to make it look semi natural.
You can also select any mode at all if you want to "Experiment"
[link=http://i253.photobucket.com/albums/hh43/Jana_f_Hayes/StepfiveSmall.jpg]Larger[/link]
There are two things you can do here.
a) leave the color as is. If that's the case, right click on the anyone of the layers and select "flatten image"
B) you can make the eye darker. In this case, you right click the layer "New Layer" and select duplicate. Do this however many times you need until the you have the right color.
THEN flatten the image as said above
[link=http://i253.photobucket.com/albums/hh43/Jana_f_Hayes/stepsixSmall.jpg]Larger[/link]
This is what I've got.
Not exactly perfect, but as long as no one zooms in, it's not that noticeable.
[link=http://i253.photobucket.com/albums/hh43/Jana_f_Hayes/FinishedSmall.jpg]Larger[/link]
Hope this helped.
Any probs?
Comment. :D
Tutorial Comments
Showing latest 3 of 3 comments

or well the dialog button to get to the layers and channels and ect. area. D:
By GodKillingVirus on Feb 22, 2009 5:16 pm
I have the new gimp, and I can't find the mode button anymore TT^TT
help?
By GodKillingVirus on Feb 22, 2009 5:14 pm

This is cool!
i have Gimp 2.4 and im New to it the only thing i know about it is the Basic Edit of Photos...and my newest thing, Animations..
By Jghelfi on Dec 28, 2008 11:49 pm
Tutorial Details
| Author |
blueragedesigns
|
| Submitted on | Dec 28, 2008 |
| Page views | 6,010 |
| Favorites | 11 |
| Comments | 3 |
| Reviewer |
technicolour
|
| Approved on | Dec 28, 2008 |